
Thanks to Trudie Cole of Poole Museum for this guest blog on using archaeology as a vehicle for teaching maths.
The introduction of prehistory in the history curriculum was great news for us here at Poole Museum, as we have a lot of archaeologists on the team. However, the elephant in the room was the increased focus on standards in maths and English. With such a crowded curriculum focused towards raising standards in these two subjects how could we realistically expect pushed teachers to develop new and interesting prehistory work?
The answer was fairly simple: look for ways where archaeology can help deliver across these core subjects. And actually, a quick review of the maths curriculum revealed lots of opportunities. There is a lot more content (so much that any realistic aim to cover it has to stretch out into other subjects), but there is also an emphasis on mathematical skills and developing reasoning and problem solving. The curriculum even explicitly mentions practicing maths in real life situations. It also talks about how maths should be taught through discussion and language and socially. To me, this sounds very much like social constructivism, which is a natural home for archaeological education.

The plan of the roundhouse excavated near Bearwood School
In all honesty, I didn’t make these connections on my own. I have been working closely with the staff at Bearwood Primary and Nursery School and their visionary Head Teacher, Laura Bennett. Laura saw the potential for developing maths teaching and learning through an archaeology project, which gave us at Poole Museum, a green light and the support to go ahead.
Another fortunate piece in the puzzle is that Bearwood School is located in an area of high archaeological activity, although this is not well known. In the fields adjacent to the school, excavations in the 1980s revealed intensive settlement from the Neolithic until the Roman period, including an Iron Age roundhouse.

The roof timbers of the Bearwood School roundhouse
In discussion with school staff we decided to build a roundhouse on the school field. Many other people have built roundhouses, including within schools and with children and communities. So we knew we were doing something achievable. What would be unique about this project was the explicit link to children’s maths work.
We started planning early on and involved children from the school on the steering group. Early work included identifying sources of funding and applying for grants. Alongside this, museum staff worked with teachers to explore cross curricular links and how to bring various maths topics to be covered into the project. The aim was to really inspire the children and give them real life opportunities for problem solving.

Building the skeleton of the house from coppiced materials
Thanks to a grant from the Heritage Lottery Fund we had the money we needed to go ahead. We coppiced some materials ourselves (museum staff, parents and children) and bought other supplies we needed. We built the skeleton of the roundhouse using manpower from the school staff, children, parents and the community. We employed a thatcher to thatch the roof. Children from the school daubed the walls.
The build was a lot of fun and engaged everyone involved with active problem solving. You can find out more about the build, what we did and how we did it on the Poole Museum learning blog.

Stories being told inside the roundhouse at the school’s summer fair
We held a community day to tell people about the project and gather memories of the local area. The school summer fayre was dedicated to the project and provided a showcase for the children to display their work.
A teacher’s pack will be released shortly with lots of the lesson plans that the teachers at the school used throughout the project. There will be more information on the Bearwood School website.
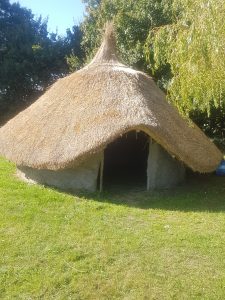
The finished roundhouse
What is particularly exciting about the project is that it has initiated a sea change in how staff at the school plan and teach. Our research indicates that many schools take a cross-curricular approach to subject delivery, but still teach maths separately. However, what our project has shown is that maths can be delivered in this way and not only is it possible, but it helps with coverage and creates an inspiring context for problem solving.
Laura Bennett and myself are really keen to develop the approach and share what we have learned. Please get in contact if you would like to find out more (t.cole@poole.gov.uk).
Thanks for this inspiring information. I teach Drawing and there is a lot of numeracy in this subject too. The two ways of measuring are by using an artist’s grid – draw a grid of squares on a picture and then scale it up by drawing out larger squares onto a bigger piece of paper. Use a ruler for this and measure in centimetres.
Rule of thumb is a bit more involved to learn but it helps you to ‘get your eye in’ so that you can become more and more confident about proportion, and you begin to see much more. Most people see very little – they just reognise things.
As your eye gets trained in this ‘analytical drawing’ also called ‘observational drawing’ you will be more and more able to draw by eye, and just quickly check your measurements.
Sitting with your back touching the back of your chair, and your arm straight (so you get a constant measurement) you put the top of your pencil to the top of someone’s head (you always need to choose a ‘unit of measurement’ for any subject) and your thumb to the bottom of their chin, and then calculate how many heads (plus the head) there are from the top of their head to their feet, and also how many heads wide the pose is. Then you draw two marks for the top and bottom of the head as large as you like on the paper as long as you can get the required number down and across, leaving a margin so your drawing doesn’t look cramped. Then measure in from the side of the paper using a paper ‘ruler’ and draw a dotted line on all sides to draw a box. Gradually as you do more drawings make the marks wider apart to train your eye – and eventually you will be able to draw a straight line by eye.
Then work out how many heads across the actual head is placed from where you are looking. And then use the head to measure – for instance – how many heads from the chin to the shoulder, from the shoulder to the elbow etc. and block in rough shapes for each part of the body. If you go outside the box you have gone wrong.
The main thing to remember is that this is about proportion. So say there are 7 heads down on your pencil measurement, there will be 7 heads down using your paper size head.
You can also make a ‘paper ruler’ – on a strip of paper mark the size of your head on the paper, and then fold it into 4 – marking quarter, half, three quarters and one. Then mark the paper size head again on the back of the paper and fold it into three – a bit more tricky so you have to take a bit more time with this.
Never use an ordinary ruler when drawing by ‘rule of thumb’ as you will get hopelessly lost. This is about proportion.
When you have blocked in your shapes then start to fine them up.
I have other exercises for drawing portraits and other subjects – if you want me to email you these then contact and I can send them to you.